New threads
It's been quite a long journey so far, but today marks the 3rd anniversary of the Edge of Emulation series of articles. When I first worked on emulating the Barcode Taisen Bardigun scanner back in 2017, I actually had no idea how much more I'd be able to do. My goal was to finish a list, researching and documenting one item at a time, but I didn't know if I even possessed the right skills to achieve anything. In the past few the years, I've met a fair amount of challenges and faced a number of difficult problems. Nevertheless, I've somehow managed overcome each of these obstacles given enough time, determination, and the help of friends and colleagues. Some devices are really simple to figure out and only take a day or two to properly emulate. Others, however, prove stubbornly difficult. The subject of this article in particular really kicked my ass.
In early 2000, the Japanese sewing company Jaguar released a machine with one very curious feature. Rather than having designs built-into the sewing machine, the Jaguar JN-100 (aka "nuyell") connected with a Game Boy via Link Cable to receive stitching instructions. The software, called Raku x Raku Mishin, came on a regular black Game Boy cartridge and handled transferring data to the JN-100. Users could then program the machine to stitch various patterns, buttonholes, kana, lettering, and even short custom paths. An American company called Singer found the JN-100 a tempting business opportunity; they later agreed release a near exact copy in the United States under their brand, the Singer IZEK 1500. In 2001, Jaguar made a second model called the JN-2000 (aka "nuotto") which boasted improved stitching speed and a dedicated embroidery arm called the EM-2000. While the JN-2000 was backwards compatible with the JN-100's Game Boy cartridge, 3 new pieces of software were made exclusively for the newer JN-2000's embroidery functions. Although Jaguar saw notable success with their products, Singer found less reception to the IZEK-1500 in the US. There were plans to make a newer version that handled embroidery as well, but Singer never fully realized those plans. As such, the JN-2000's ability to embroider clothes with Mario-themed artwork remained exclusive to Japan.
Some may laugh at how bizarre it sounds to combine Game Boys and a sewing machines, yet all 3 models are rather historically important for both gaming and home-based sewing. Although industrial sewing machines already had programmable stitching for years, the consumer market lagged behind in terms of options and price. Today, cheap digitized sewing is the norm, but at the turn of the century, Jaguar sparked a sort of revolution by giving consumers affordable and easy to use equipment. Using a Game Boy as the primary interface reduces complexity (there are only a few buttons, menus can be colorful, and you can display as much information as you want, even tutorials). It also saves on cost by using known components instead of creating hardware from scratch. Furthermore, it's not uncommon to feed sewing machines instructions from an external source. Current sewing machines often connect to PCs via USB to transfer embroidery designs, and perhaps smartphone apps communicating over Bluetooth represents the future. At any rate, Nintendo's handheld system became the first (and only???) such device to work in conjunction with a sewing machine and did its part to bring digital stitching and embroidery to the masses. Though it seems like a strange marriage, both sides work well together in practice.
Even so, these sewing machines are among the most exotic and fascinating of Game Boy accessories. They demonstrate just how far the humble Game Boy could expand beyond gaming. Unfortunately, while we know much about the history of the Jaguar and Singer machines, how exactly they operated remained a mystery for decades. Ever since I learned about them, I couldn't help but wonder what secrets were buried inside. Technically speaking, neither these sewing machines nor their software are video games. Nevertheless, they're all simply too culturally important to just ignore. Rather than let their story disappear over the ages, I decided to try my hand at preserving them. Now, I've emulated some pretty wild things on the Game Boy: motion-based infrared toys, sonar-enabled cartridges, Amiibo-like figurines, and robots most recently. But emulating a sewing machine? That's something else completely. I mean, you'd have to be crazy, right?
Needle in a haystack
Properly studying these machines requires physical access, which in turn means making quite a few investments. Not only are there 3 distinct models (JN-100, JN-2000, IZEK 1500), but each on their own costs a sizable sum. The JN-100 and IZEK 1500 units are uncommon but not necessarily rare, yet a handful of complications raise their prices. An IZEK 1500 typically runs anywhere from $150 to $250 USD on average for just the hardware alone, but adding original material such as the VHS instructional tape, the Game Boy software, or even the box it was packaged in will hike the value by hundreds of dollars. Shipping, even domestically, accounts for another $25 to $50 USD. JN-100s typically go for far less on Japanese buying sites. Many are labeled as "junk" and can go for $20 to $50 USD. However, international shipping can easily double or triple that amount.
The JN-2000 is truly rare, given that it probably sold in smaller quantities. While a dozen or so auctions for the other two machines occur every few months, only a handful of JN-2000s appear to be sold each year. The damage to a collector's wallet varies wildly, from about $30, $160, $400, or even $1500 depending on completeness. The most expensive one I've seen to date asked for $5100, featuring a mint condition JN-2000, EM-2000, two copies of Raku x Raku Cut Shuu/Moji and one copy of Mario Family (which is probably the rarest Game Boy Color software out there). Needless to say, acquiring all three sewing machines took a fair amount of cash, patience, and luck. Thankfully I imported both Jaguar models well before COVID-19 struck. The virus has disrupted many forms of transportation, strangling shipping options, and increasing fees (sometimes exponentially in fact, looking at you DHL).
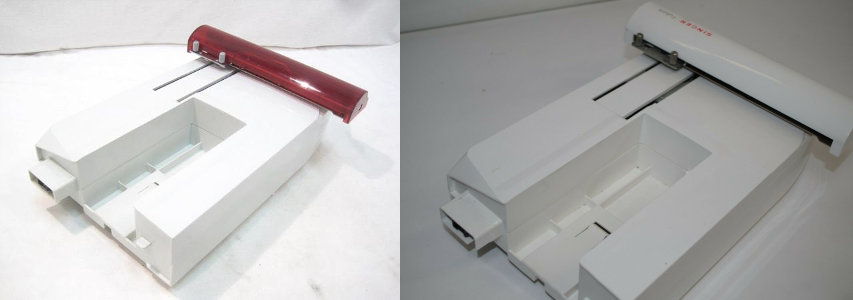
As previously mentioned, the Jaguar JN-100 and the Singer IZEK-1500 are near perfect copies of one another in almost every regard. The only obvious differences are their power cords (retractable on the JN-100 versus one that plugs into the IZEK-1500) and the color schemes. While the JN-100 has 6 variants, the IZEK-1500 comes only in blue. Both machines have semi-transparent plastic parts that call to mind some of the iMac G3 aesthetic. The JN-2000 has a completely different body style, similar to other Singer products like many Futura models. It has clear plastic segments as well, although it was only ever produced in red. The frame of the machine has an empty cradle where a Game Boy can be placed while sewing. Most notably, part of the JN-2000 slides away to reveal a port where the EM-2000 embroidery arm connects. All 3 units have a Link Cable built-in.
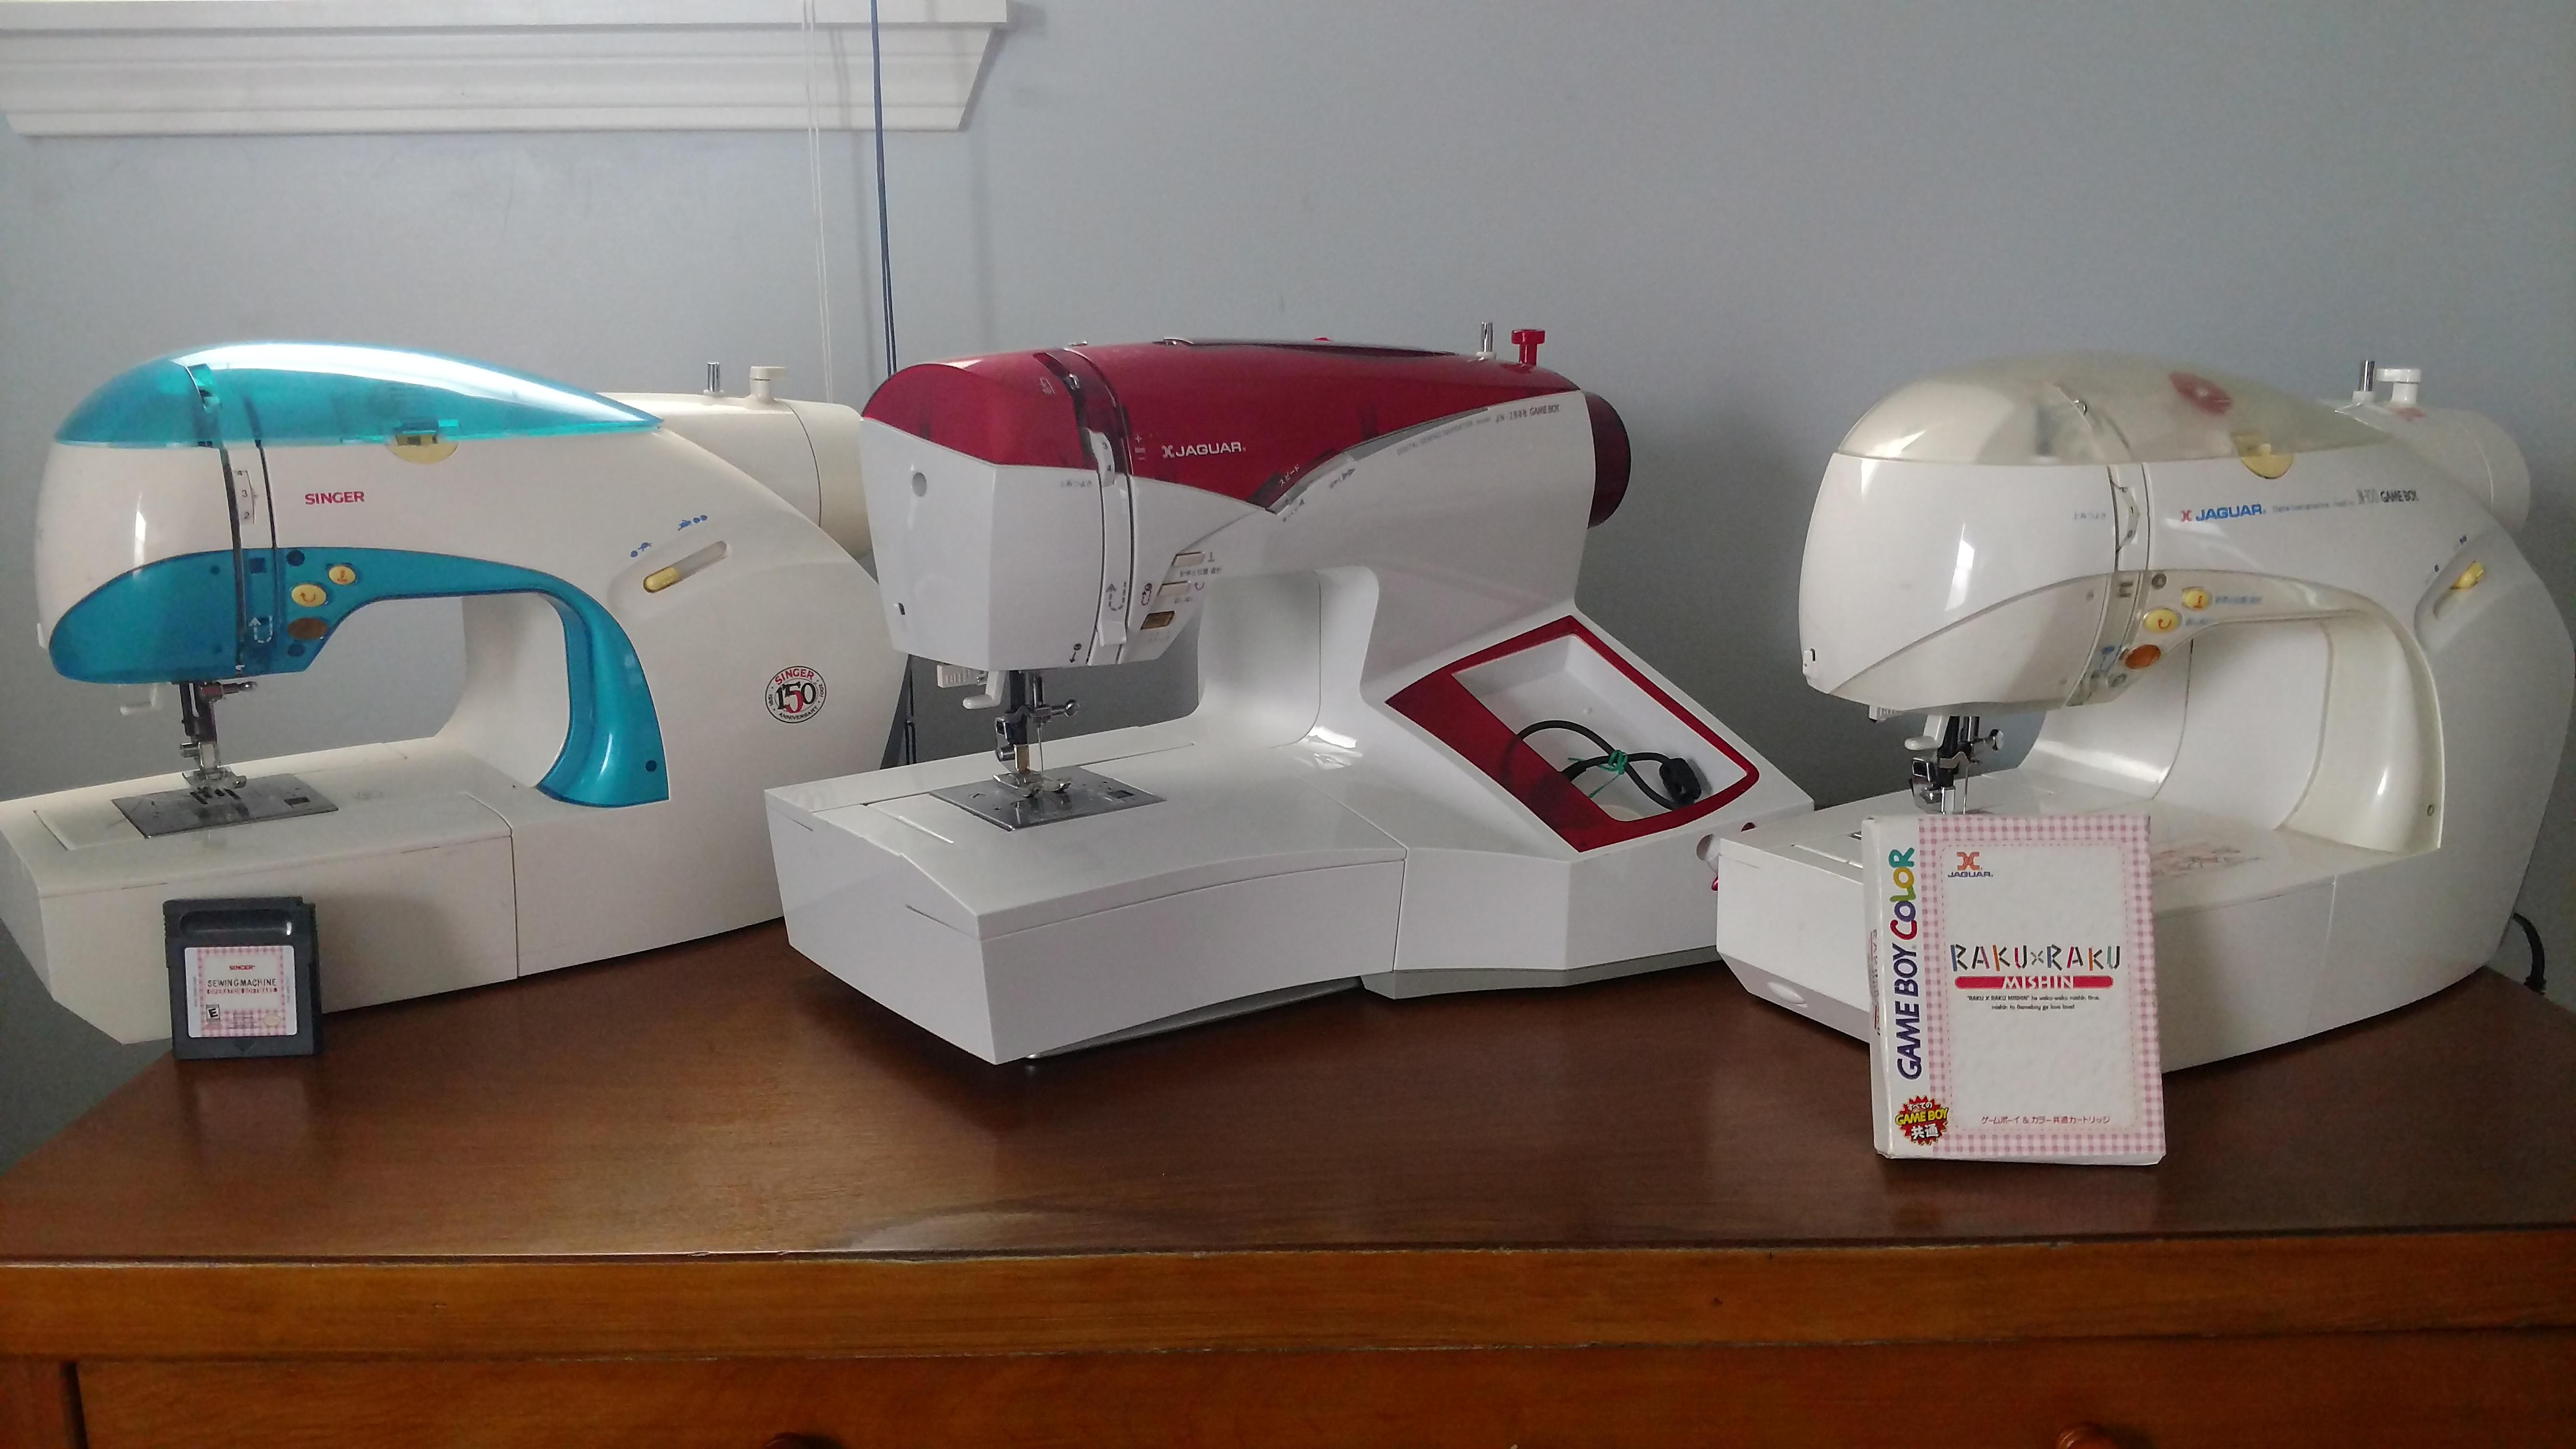
Left to right: IZEK 1500, JN-2000, JN-100. It wasn't easy fitting the whole gang on my desk. Click to enlarge.
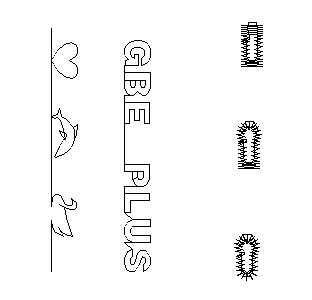
A total of 5 compatible software titles were made for these machines. The first, "Raku x Raku Mishin" came with every JN-100. It focuses on stitching preset and custom patterns, buttonholes, some Latin characters, kana, and a few kanji. When the IZEK-1500 came to the US, the name changed to "Sewing Machine Operating Software" however its core functionality remained unchanged. Instead of kana and kanji, however, support for the Latin alphabet was expanded along with a few additional styles (cursive and outlined letters). Apparently a European version exists, but details are scarce. "Raku x Raku Moji" deals with embroidery of katakana, hiragana, some Latin characters and symbols, and a number of kanji. Unlike Raku x Raku Mishin, these designs are much more elaborate, composed of hundreds of stitches instead of 20 or 30. "Raku x Raku Cut Shuu" deals with embroidery of some cute if generic artwork, e.g. a rocket ship, some flowers, and a bunch of cartoon animals. The last cartridge, "Jaguar Mishin Sashi Senyou Soft: Mario Family" is much the same, however, all of the artwork is Mario-themed. Princess Peach, Mario, Luigi, Wario, Yoshi, and several others appear, although Bowser is surprisingly absent.
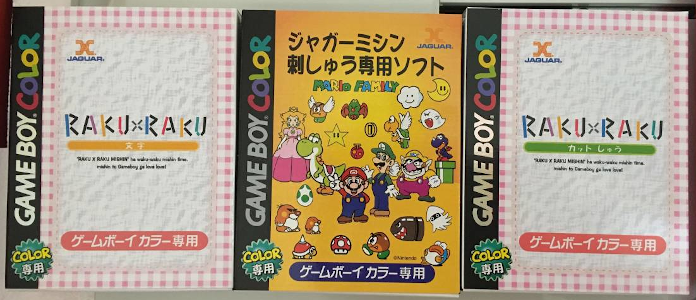
These GBC software titles are among the rarest. A Complete-in-Box copy Mario Family could easily require a small loan...
My initial research into these sewing machines began exactly one year ago at the start of May 2019. Usually I spend only a few weeks on an item before cracking it. At most I'll take a few months, analyzing and running tests every other day until I figure things out. I really thought I'd be able to get most of the work done in a weekend or two. If things had gone according to plan, this article would have been written in 2019. Unfortunately, I spent far longer than just a couple of days. These sewing machines presented me with a puzzle the likes of which I'd never dealt with before and genuinely challenged me on multiple occassions. While I wouldn't call them the most difficult things to reverse engineer they certainly proved to be the most frustrating. What I expected to be a relative cakewalk turned into something much more than that.
Sew close, yet sew far
The Singer IZEK 1500 was the easiest machine to acquire, so it was the first one I looked at. To begin, I created a very simple ROM hack of Sewing Machine Operation Software that recorded every serial transfer after a serial interrupt. Interestingly enough, I didn't see any relevant data, just repeating patterns of two values: 0x00 and 0xFF. Running the ROM through GBE+'s debugger revealed that not every transfer was supposed to trigger a serial interrupt; consequently the ROM hack was missing crucial information. Unlike every other Game Boy accessory ever made, the IZEK 1500 switches between sending data via an internal and external clock. Essentially, it switches back and forth between acting as master and slave when communicating with the Game Boy (and the handheld switches too, always the opposite to match the machine). The data the Game Boy sends to the IZEK 1500 is always done via an external clock, so the sewing machine controls the rate at which bits are transferred. Serial interrupts are disabled via software for these transfers, yet GBE+ could see them just fine and print out a log for me to review.
The data captured by the emulator looked to be a packet sent to the sewing machine with instructions on how to stitch a pattern. Immediately, I recognized it had a header, followed by a body containing what looked to be XY coordinate pairs for stitching points and some kind of checksum value all the way at the end. As far as I could tell at the time, a pattern was made simply by shifting the stitching point up, down, left, or right by different amounts. In order for GBE+ to properly emulate these sewing machines, it had to recreate the stitching as pixels on a screen. All it needed to do was take the XY coordinates from the packet data and start drawing lines, right? Pretty simple stuff, and perfectly straightforward. Easy peasy.
The first couple of patterns, labeled A-001 through A-010 were lines that moved straight down with changes in the X coordinate sometimes to make diagonals. I copied some line drawing code from my NDS 3D renderer, gave it the coordinates from the packet, and saved the results to a BMP file. The output from these patterns matched the previews given on the Game Boy screen. When it came to the rest of the patterns though, things quickly broke down. A prime example of this failure was pattern B-007. Rather than zig-zagging like the others, it went straight sideways and went vertically up. I was treating every Y coordinate as positive to move downward since I didn't know how the IZEK 1500 handled negative numbers. It should have been relatively obvious, say like all negative coordinates have Bit 7 set high or something, while all positive numbers have Bit 7 set low. It was nothing like that at all.
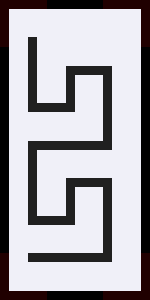
This is the pattern in question.
---------------------------------------------------------
X COORDINATE	| Y COORDINATE		| MOVEMENT
---------------------------------------------------------
0x01		| 0x0D			| DOWN
0x01		| 0x0C			| DOWN
0x01		| 0x14			| RIGHT
0x0E		| 0x1C			| UP
0x0E		| 0x14			| RIGHT
0x1B		| 0x0C			| DOWN
0x1B		| 0x0C			| DOWN
0x1B		| 0x14			| LEFT
0x01		| 0x0D			| DOWN
---------------------------------------------------------
Now here is the raw data sent by the Game Boy.
I used a test piece of fabric and observed each movement to verify what each XY pair was supposed to do. It's easy enough to see that the X coordinates behave normally, gradually shifting from left to right by increasing, then suddenly shifting back to the left to restart the pattern. The Y coordinates are doing something else, however. At first glance, they're all over the place, although that's not quite unexpected considering the pattern goes up and down a bit. Still, the Y coordinates looked very bizarre to me when I started my investigation. One important detail to know is that while the X coordinates operate in terms of absolute positions, the Y coordinates don't. The width of a pattern only go so far, (0x00 to 0x1F), because the needle can only physically move that much. The length of a pattern goes as long as there's fabric to keep feeding into the machine.
Y coordinates were quite the hassle to correctly interpret. In a sane world, values like 0x08 would move the fabric down by 8 units, 0x18 would move the fabric up 8 units, and 0x00 would stay put. Ideally, it would look like a 5-bit version of One's complement. Just seems intuitive, right? The difference between up and down would be flipping Bit 4 on or off, and zero would maintain the current vertical position. That's what I was expecting, at least. The reality was much more difficult to deal with. In the example of Pattern B-007, it has a couple of vertical lines, but no Y coordinate even comes close to being zero. At the very least, you'd think that a horizontal line would be represented by having 2 different X coordinates and 2 Y coordinates of the same value, but that too was not the case.
I was so preoccupied with how I felt the coordinates should have looked like that I failed to notice how the coordinates actually worked. I spent months trying to come up with all kinds of crazy rules to describe when the machines made horizontal, diagonal, and vertical lines for all other patterns. A lot of hours were wasted trying to formulate every possible scenario of X and Y coordinates and what kinds of lines they should have drawn. In hindsight, I missed several obvious clues that could have simplified my work.
One day, while reviewing all of the rules I'd compiled, I suddenly noticed something very curious about horizontal lines. They all seemed to use 0x14 as the Y coordinate. Why use that value to signify no vertical change though? Why use that value instead of an actual zero? Another thought struck my mind: what if values less than 0x14 moved down, and values greater than that moved up? Suddenly almost every single pattern made perfect sense. Since GBE+ would take any pattern it captured via serial transfers and draw it to a BMP file, I could visually assess the results very quickly. With the old, complicated rules, only a handful actually looked correct while many did not. Once the code changed based on my new perspective, nearly all of the patterns were rendered appropiately. The last thing to do was calculate the right lengths for each Y coordinate. Ultimately, I came up with this chart:
0x00				Shift Down 1.25mm
0x01				Shift Down 1.1875mm
0x02				Shift Down 1.125mm
0x03				Shift Down 1.0625mm
0x04				Shift Down 1.0mm
0x05				Shift Down 0.9375mm
0x06				Shift Down 0.875mm
0x07				Shift Down 0.8125mm
0x08				Shift Down 0.75mm
0x09				Shift Down 0.6875mm
0x0A				Shift Down 0.625mm
0x0B				Shift Down 0.5625mm
0x0C				Shift Down 0.5mm
0x0D				Shift Down 0.4375mm
0x0E				Shift Down 0.375mm
0x0F				Shift Down 0.3125mm
0x10				Shift Down 0.25mm
0x11				Shift Down 0.1875mm
0x12				Shift Down 0.125mm
0x13				Shift Down 0.0625mm
0x14				No Change
0x15				Shift Up 0.0625mm
0x16				Shift Up 0.125mm
0x17				Shift Up 0.1875mm
0x18				Shift Up 0.25mm
0x19				Shift Up 0.3125mm
0x1A				Shift Up 0.375mm
0x1B				Shift Up 0.4375mm
0x1C				Shift Up 0.5mm
0x1D				Shift Up 0.5625mm
0x1E				Shift Up 0.625mm
0x1F				Shift Up 0.6875mm
0x20				Shift Up 0.75mm
Solving the meaning of these Y values actually revealed one other oddity about the XY coordinates. For any given X coordinate, the Y coordinate that dictates vertical movement is the last previously sent Y coordinate, not the following Y coordinate. To illustrate this, going back to the coordinates for the pattern B-007, the first horizontal line going right doesn't really use XY values of 0x01, 0x14. Instead, it's better read as 0x0E, 0x14, where the X value indicates rightward movement, and the Y value indicates no vertical movement. It may be better to classify them as YX values, but in either case, the raw bytes of the coordinates are somewhat "misaligned" from a human perspective.
Converting this information into pixels was relatively straightforward. Every X value represents 1 pixel. For Y values, 0x14 is zero, every value above it simply moves up 1 pixel, and every value below it moves down 1 pixel. With that, even the most complicated patterns like swans, flowers, and hearts were drawing without any issue in GBE+. Even custom user-made patterns drew flawlessly. Figuring out XY coordinates caused plenty of headaches and a fair amount a swearing. Let me just say that the way these 3 machines handle everything is dumb. There's absolutely nothing intuitive about using 0x14 as a replacement for zero. There's absolutely nothing intuitive about using the previous Y coordinate instead of the next one. Maybe someone will point out that this is how many sewing machines work internally or it's just how things are done for devices like this or it's just how some microcontrollers are designed. I can actually see and understand the logic and reasoning behind some of it. But I don't care. It's dumb, and it will never not be dumb in my mind.
Anyway, with every pattern working properly, I moved on to testing lettering. This feature only partially worked in GBE+. Strangely enough, the BMP output file used for debugging only showed the first couple of letters. For example, when trying to stitch "ABCD", only "AB" would show up. After thoroughly examining the data transferred from the Game Boy, I realized that GBE+ wasn't handling a key part of the packet format. When the Game Boy sends a packet to the sewing machine, the packet can only be 128 bytes long. Stitching a long sequence of letters, however, could require several hundred XY coordinates (as many parts are double or triple stitched). Sending that many XY coordinates means sending multiple packets, and GBE+ only handled the first one it encountered. With a few adjustments, GBE+ parsed all additional packets and fixed not only lettering but buttonholes as well.
A few of the more complex stitchings, some lettering, and some buttonholes. The buttonholes are apparently questionable even on real hardware.
Textile throwdown
After testing both the Sewing Machine Operation Software and Raku x Raku Mishin ROMs, I was satisfied that GBE+ could faithfully emulate the Singer IZEK 1500 and the Jaguar JN-100. This was only half the battle, as the Jaguar JN-2000 and its embroidery arm remained a total mystery. Given how complex embroidery can be, I could only imagine what it would be like to tackle the EM-2000. One major problem blocking progress was the fact that I didn't have an EM-2000 at all. The only time I found a couple for sale, they came with the JN-2000, which would have set me back well over $1000 in those cases. It wasn't until after I finished all my research on these machines that one reasonably priced auction actually popped up. Needless to say, I didn't have the hardware I needed.
The EM-2000, however, looks a lot like some of the embroidery arms Singer made around that time for some of its Futura models. The two look identical save for the color scheme. I suspected that a Futura embroidery arm might work with the JN-2000. After all, the Singer IZEK 1500 was a copy+paste clone of the JN-100, so maybe the two companies shared more designs with each other. When my own Futura embroidery arm arrived, it wouldn't fit into the JN-2000's slot, as it had two little pieces of plastic preventing them from sliding together. An hour of sanding by hand removed the plastic guards and allowed the Futura hardware to fit onto the JN-2000. Unfortunately, it was totally incompatible. No software recognized that embroidery arm was attached.
On the left, the EM-2000. On the right, a Futura embroidery arm. They look like twins. Same size, same shape. Sadly, only one is compatible with the JN-2000.
With no means of probing the hardware directly, my only option was to reverse-engineer the software and whatever protocol the Game Boy used during embroidery. The first challenge is to determine how the JN-2000 reports to the Game Boy whether or not the EM-2000 is present. Before and after sending a packet to the sewing machines, the Game Boy issues a sort of "keep-alive" byte to continually check the connection. The sewing machines are supposed to return their current status as a single byte. Responding with zero allowed most of the IZEK 1500 and JN-100 stuff to process normally, but Raku x Raku Moji, Raku x Raku Cut Shuu, and Mario Family all complained about the missing EM-2000. By accident, I had previously discovered that setting Bit 1 of the status byte high caused the software to believe the EM-2000 was there. After trying a few more random values, it appeared that 0x06 and 0x07 let the software continue with no errors. The first seemed to indicate a small embroidery hoop was attached, and the second indicated a large embroidery hoop was attached. Only certain designs can be stitched with a large hoop.
Using the correct status byte triggered a transfer instead of an error. The data sent from the Game Boy looked very similar to the other packets used by the IZEK 1500 and JN-100. The format of the coordinate data was clearly different, however. Unlike the other somewhat convoluted coordinate scheme, the embroidery coordinates were straightforward and easy to understand. Almost immediately I saw how it worked just by glancing at the numbers. A value like 0x05 would move the stitching point right 5 units for X coordinates or down 5 units for Y coordinates. A value like 0x45 would move the stitching point left 5 units for X coordinates or up 5 units for Y coordinates. If Bit 6 is set high, X and Y coordinates move in one directions, otherwise they go in the opposite direction. XY coordinates weren't mismatched either. That was the kind of simplicity I was looking for with the IZEK 1500 and JN-100!
By connecting the lines between these coordinates, GBE+ started drawing many of the designs. Unfortunately, nearly all of them had serious rendering problems, with bits and pieces all over the place. Mario had a misplaced face, Princess Peach had none, and Luigi was just a pile of squiggles. In each case, only the inital part looked correct, then promptly went off the rails. When doing embroidery, designs are broken up into several continuous sections. Most of the time, a large portion of the design can be stitched from one point to the next, sort of like contour drawing. At other times, however, it's impossible to stitch certain segments without completely switching to a new postion that's not connected to the old one. Examples of this include the eyes of many characters, objects not attached to one another (the bubbles surrounding the dolphin character), and colored areas distinctly separated by outlines or other colors. The JN-2000 basically stops stitching while the embroidery arm moves to a new position. GBE+ was treating everything like one long, connected line, never moving to that next location when necessary. Inside some of the packets sent to the JN-2000 are sections that describe how it should jump to a new area. They begin with a 0xBE byte and end with a 0xBD byte. Data looks something like this sample:
0xBE		START
0xEB		BYTE 1
0xFF		BYTE 2
0xBA		BYTE 3
0x00		BYTE 4
0xFF		BYTE 5
0x00		BYTE 6
0x00		BYTE 7
0x00		BYTE 8
0x00		BYTE 9
0xBD		END
My first thought was that the above data represented some kind of 16-bit number transferred Least Significant Byte (LSB) first. So the first two bytes form the hexadecimal number 0xFFEB. By that same logic the second 16-bit number should be 0x00BA. Assuming that these 16-bit numbers are X and Y shifts, the first number might be something like a negative X value (move left), and the second might be a positive Y value (move down). However, when examining the rest of the data, there is an odd amount of bytes. There is enough for 4 16-bit numbers and one extra 8-bit value left over. This part really confused me for a few days. From the above data, it looks like the 3rd 16-bit value should be 0x00FF and the 4th 16-bit value should be 0x0000 with the last byte just hanging there.
As I looked over different sets of shift data, I had one of those moments where an idea just jumps into your head. What if, in the above data, the 5th byte merely acted as a sort of separator for the next 16-bit X and Y shifts? That would explain why the Game Boy sent an odd number of bytes. Other designs had multiple shifts, and when I checked my logs, I found that after every X and Y shift, there was in fact a 0xFF byte placed in between them. For the above data, the last X and Y shifts are just zero, indicating no movement. With a few changes in GBE+'s code, the emulator began to correctly parse all shift coordinates. The only thing that went wrong was getting the up and down directions reversed.
0xFFEB		X SHIFT #1	MOVE LEFT 21
0x00BA		Y SHIFT #1	MOVE UP 186

0x0000		X SHIFT #2	NO MOVEMENT
0x0000		Y SHIFT #2	NO MOVEMENT
A few designs were still messed up, however. After certain shifts, the X and Y stitching coordinates were mixed up, leading to lines that went in all sorts of directions. Packets sent to the JN-2000 are only 128 bytes long, and sometimes the shift data has to get split across two packets. This proved tricky to handle. All three sewing machines use the byte 0xB9 to signal the start of a packet and 0xBB to signal the end of another one. These bytes had to be checked to determine whether they were part of packet management or if they were in fact part of the shift data.
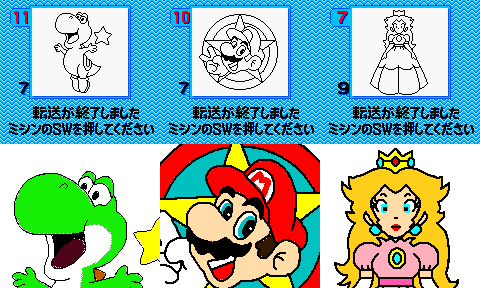
The last things to solve were the initial X and Y coordinates. All embroidery designs are in fact several designs in a sequence. For example, Mario Family will first draw Yoshi's green parts, then move onto the shoes and spikes on the back, followed by the saddle, the white tummy, and finally the overall outline. The idea is to embroider portions that use the same color. The software asks the user to select a new thread and sends separate transmissions to the JN-2000. The first packet of each transmission dictates the starting X and Y position. These have no relation to any of the previous stitching points or shift coordinates, as the user can actually transfer any part of the design out of order or skip sections entirely (for example, when using white fabric as the base, you may not want to embroider Mario's gloves). If the wrong start coordinates are used, then nothing matches up as it should when drawing every segment.
This demonstrates how initial X and Y values are supposed to work. Each piece is stitched separately, but they all have to line up properly.
The starting X and Y coordinates are also 16-bit LSB values. They are absolute values, meaning they dictate exactly where to start stitching inside the embroidery hoop. Users can choose the starting point themselves via software, and the Game Boy will transmit the appropiate data. By manipulating this feature, it was possible to record the maximum and minimum X and Y values and thereby reveal how these coordinates worked. The right side is defined as 0xFFF and the left side is defined as 0xFED0. The top is defined as 0xFFFF and the bottom is defined as 0xFE30. With those measurements, GBE+ could plot the correct starting point for each design. This in turn finally fixed every outstanding issue for embroidery.
At long last, everything looks perfect!
Stitching it all together
Emulating these sewing machines up to this point was mainly GBE+ spitting out an image file once it finished processing the final packet sent by the software. This approach, while suitable for debugging and experimental code, is very unsatisfying for normal users. Although it technically gets the job done, I've always felt emulation should be about exploring things, not merely recreating them for observation. To truly preserve the overall experience of the something like the IZEK-1500, people need to interact and control the output in real-time. It all comes back to the question: how does one really emulate a sewing machine?
In my previous article about the Cyber Drive Zoids toys, I used a sub-screen to draw a tiny little animated robot that mimicked the model, albeit somewhat crudely. My inspiration for a sub-screen in Cyber Drive Zoids actually came from my work on these sewing machines, I just ended up completing that project first. The idea here is to use a sub-screen as a sort of drawing pad. A cursor moves around, and with the mere push of a button, patterns and designs start appearing. A secondary interface in the form of a menu helps dynamically set different options, such as thread coloring, thread thickness, stitching speed, saving the image, clearing the image, and attaching/detaching an emulated EM-2000.
The end results were quite pleasing, feeling very much like a virtual sewing machine. I think it provides a lot of value in that the sub-screen demonstrates exactly how the sewing machines would have stitched things. For example, it illustrates the way an EM-2000 would have moved back and forth, showing us exactly how the real thing creates designs like Mario and company. Most of us will never get the chance to see these devices with our own eyes, much less poke around the patterns they made. Now, however, anyone can see for themselves what all the fuss was about.
Even though these aren't really games, you can still have fun playing around with them!
Loose ends
Before closing this article, I'd like to take the time to cover some misconceptions surrounding the sewing machines. First, the only sewing machine capable of doing elaborate embroidery designs is the JN-2000. You can't use the IZEK-1500 or the JN-100 with Mario Family, for example, because they can't use the EM-2000. They lack the slot at their base for the embroidery arm. Interestingly enough, both the Raku x Raku Mishin and Sewing Machine Operation Software cartridges have error messages complaining that the EM-2000 is attached, even though it's probably impossible to do so (without some extreme modifications at least). This suggests that the EM-2000 was in development when the JN-100 was released, and it's also probable that IZEK expected to make their own model based on the JN-2000.
The second point I want to bring up is that while the Game Boy does display a preview of each embroidery design for the JN-2000, the pixel art is only an approximation of the final stitching. There are some details that just don't fit on the 160x144 screen. For example, for Princess Peach, the Game Boy omits her eyebrows, eyelashes, the ruffles on her dress around the neck, and the gap between her gloves and the sleeves or her dress. The embroidery is far more intricate in many cases than the software presents, especially regarding some of Raku x Raku Cut Shuu's designs. The final results, in any case, are impressive in contrast to their Game Boy representations.
Lastly, yes, these sewing machines really did work! This is strangely a common reaction when people learn about these models (I mean, would Jaguar or Singer really sell such an expensive yet defective product?) All 3 of them are actually pretty good machines, and they can work without the Game Boy, though at that point they're limited to stitching straight lines. They did everything they claimed they could without much if any trouble.
Clothing arguments
Dealing with these sewing machines has definitely been a wild ride. They turned out to be quite a handful, but in the end I feel it was worth all of the work. Each one adds a very unique chapter to video game history that we will hopefully never lose now. It's been 20 years since the JN-100 first brought Game Boy powered sewing to the world, so for the anniversary of that achievement, I can think of no better way to celebrate it than via emulation.
I've been fascinated with exotic gaming peripherals for some time, but I have to admit, the JN-100, JN-2000, and IZEK-1500 are by far the most impressive ones I've examined. It's just one of those things where you simply shake your head thinking about how nuts it sounds. A sewing machine controlled by a Game Boy? I remember when MAME finally emulated a Sonic The Hedgehog popcorn machine, and I thought that was some downright insane dedication to video game preservation. Ever since then, I've wanted to do something similar, bringing a big, bulky, weird piece of hardware back to life, something that was flashy, hard to find, and expensive. I think I've fulfilled that goal now.
It seems like I just started writing these articles not too long ago, but it's already been 3 years! In that time, I'm proud to say that nearly all of the add-ons that directly affected gameplay and software programming in commercial DMG and GBC games are emulated in some capacity! Only 1 notable DMG accessory is still at large. When I started in 2017, there were numerous unknowns, with at least 7 devices that hadn't been researched at all in decades. I hope I've done my small part to make Game Boy emulation as a whole better, and I hope that these Edge of Emulation articles inspire people to start looking at other areas of gaming that remain forgotten and need preservation. Having said all of that, my path is far from complete. That TODO list of mine just never seems to get any shorter. My ambition for 2020 is to continuously jump from one item to the next, and I've already got my sights set on the next big thing: the AGS-006, aka the Play-Yan. With any luck, I'll have something to report in the next few months.